Archives: Installing Oracle ZFS Storage Appliance simulator for you virtual storage requirements
Oracle has released it ZFS Storage Appliance software simulator. It is sold as an Tier 2 storage hardware, but using the simulator you can get all its powerful storage management features on your Virtualbox. The simulator is free and it has no time limits nor restrictions (although one restriction – the simulator is not clustered).
Some use cases for the simulator:
* You can try out the new ZFS Storage Applicance software patches before applying them on the real physical storage box
* You want to test some Oracle database features that are only activated when using Oracle storage (HCC)
* You want to provide shared network storage fro your VM-s, with advanced storage capabilities, like snapshots, cloning, compression, deduplication, remote replication, encryption etc
* You want to evaluate ZFS Storage Appliance features before purchasing the real box or before using a specific feature in production
Setting up the simulator under virtualbox is very simple and quick. On the configuration below I make no effort to secure the system, since it is intended to be used only in my Virtualbox environment.
Requirements
Virtualbox 4.2.12 or later.
I’m using Virtualbox 5.
Download the software
Go to the ZFS Storage software page and click Try the simulator. First you have to register the download and then you can download ZIP file containing the software.
Unzip the file you downloaded, then you’ll get OracleZFSStorageVM directory with 18 files under it.

Import VM to Virtualbox
Open Virtualbox Manager, go to File > Import Appliance.
Browse to Oracle_ZFS_Storage.ovf from the unzipped software directory.

Click Continue.
On the next screen you can view the imported VM settings and then press Import.
Initial configuration
After importing you will have a new VM called Oracle_ZFS_Storage.
Open Settings for this VM and go to Network tab. Verify that it is connected to the correct virtual network. Mine is automatically imported under the only Host-only Adapter network I have and I’m going to keep that setting.

Now launch the VM.
It will take a 10+ seconds to boot up and then on the first boot it will ask you a few questions on basic network settings and root user password.
Supply the requested values:

Press Enter when done. After that it will show you a blank screen for 30+ seconds and after it is done the system is ready.

Now open the URL requested https://192.168.56.98:215/ in your browser to finish the initial setup.
Log in as root supplying the password you set previously.
Welcome screen appears. Click Start to go through a small initial setup wizard. Everything can also be changed later.
First screen, networking, just press Commit.

Second screen, DNS, just press Commit.
Next, NTP, just press Commit.
Next, Name Services… here you need to set up LD… just kidding, press Commit.
Now, Configure storage, here you can set up the storage pool.

Press the plus sign before Available pools and supply a pool name – pool1 in my example.

On Verify and allocate devices screen you can just press Commit
The next, Choose storage profile is the most interesting. In production it requires a lot of consideration, because every choice has very different availability, read performance and write performance implications. Here, Iäll just choose Striped to get the maximum performance and no loss in available storage size. Obviously this would be a very bad choice for production system due to no availability or fault tolerance at all.

Press Commit. You are now back in Configure storage screen, here again press Commit.
On the final Registration & Support page there is no Commit button, but there is a button called Later, press it and then confirm it by pressing OK.
All done 🙂
Set up iSCSI
If you want to share iSCSI block devices, then first need to create iSCSI Target.
Go to Configuration > SAN and click on ISCSI.

Click the plus sign before Targets.

If you don’t care how the IQN looks, just provide some name for Alias and press OK.

It will then automatically generate IQN for you, so in my example it is named: iqn.1986-03.com.sun:02:455fe302-6504-6eaf-d478-9b3acf9f4afe
Set up SNMP
By default SNMP service is not enabled, but if you want to test Hybrid Columnar Compression it is required. You can get more details about it from this blog post.
Go to Configuration > Services, and click on the aroow button to expand the Services menu.

Click on SNMP from the left-side menu.
First click on the power button symbol under SNMP to enable the service and set the following values:
* Authorized network/mask: 0.0.0.0 / 0
* Appliance contact: your email address
* Trap destination: 127.0.0.1

Click Apply.
REST API
All storage configuration can also be done using REST API. You can create new LUNs, filesystems, change thir properties, snapshot, clone, drop… everything that you can do in GUI you can also do over REST API.
I use it a lot in production in database backup&restore scripts and also in providing production database clones for testing.
I have also blogged about it before: SAMPLE CODE: USING THE ORACLE ZFS STORAGE APPLIANCE REST API FROM PYTHON
I really hope I can soon publish my full Oracle database backup&restore script suite that also relies on ZFSSA sotrage features heavily.
ZFSSA REST API documentation is here
REST API is turned on by default and it is accessible over the same URL as the management GUI: https://192.168.56.98:215/
Create NFS filesystem
To create a new NFS filesystem go to Shares

Click the plus sign next to Filesystems.

Write filesystem name and you can also set the share UID, GID and permissions. For example if you are using it for oracle database and have installed the oracle-rdbms-preinstall rpm package under linux, then you could set User and Group values to 54321 to get the correct permissions on mount.
Click Apply.
The newly created filesystem appears on the list.

You can now mount the NFS filesystem on a target machine, in my example using the settings:
mount -t nfs 192.168.56.98:/export/oradata /mnt
If you hover over the filesystem entry, you notice a pencil icon on the left. If you click it you can change filesystem properties, restrictions and snapshots.

If the filesystem is going to be used for Oracle database data files (not for RMAN, UNDO, REDO, TEMP) , then one thing that you may want to change is Database record size to be equal to the tablespace block size 8K.
Click Apply.
Create iSCSI LUN
Go to Shares and click on LUNs. This way you can present block devices to servers, to be used for example as ASM disks.

Click plus sign next to LUNs.

Fill out the properties, again, if the LUN is to be used for Oracle tablespace data files, then you may want to set the Volume block size to tablespace block size (8K).
Click Apply.
The newly create LUN appears on the list.

Again, the pencil icon opens the LUN detailed properties page.
NB! LUNs can also be compressed and deduplicated!
Let’s try accessing this LUN from Linux. First connect to ZFS:
[root@localhost ~]# iscsiadm -m discovery -t sendtargets -p 192.168.56.98
192.168.56.98:3260,2 iqn.1986-03.com.sun:02:455fe302-6504-6eaf-d478-9b3acf9f4afe
[root@localhost ~]# iscsiadm -m node --login
Logging in to [iface: default, target: iqn.1986-03.com.sun:02:455fe302-6504-6eaf-d478-9b3acf9f4afe, portal: 192.168.56.98,3260] (multiple)
Login to [iface: default, target: iqn.1986-03.com.sun:02:455fe302-6504-6eaf-d478-9b3acf9f4afe, portal: 192.168.56.98,3260] successful.
Now I should have the new LUN mapped to linux:
[root@localhost proc]# cat /proc/scsi/scsi
Attached devices:
Host: scsi1 Channel: 00 Id: 00 Lun: 00
  Vendor: VBOX     Model: CD-ROM           Rev: 1.0
  Type:   CD-ROM                           ANSI  SCSI revision: 05
Host: scsi2 Channel: 00 Id: 00 Lun: 00
  Vendor: ATA      Model: VBOX HARDDISK    Rev: 1.0
  Type:   Direct-Access                    ANSI  SCSI revision: 05
Host: scsi3 Channel: 00 Id: 00 Lun: 00
  Vendor: SUN      Model: Sun Storage 7000 Rev: 1.0
  Type:   Direct-Access                    ANSI  SCSI revision: 05

[root@localhost proc]# cat /proc/partitions
major minor  #blocks  name

  11        0      57620 sr0
   8        0   12582912 sda
   8        1     204800 sda1
   8        2   12377088 sda2
 252        0   11325440 dm-0
 252        1    1048576 dm-1
   8       16   10485760 sdb
My new device is /dev/sdb. Lets confirm its SCSI ID.
[root@localhost proc]# /usr/lib/udev/scsi_id -g -u /dev/sdb
3600144f09ff1616800005662f2f40001
Matches perfectly with the ID in ZFS management interface GUID column (ignore the first digit).
Archives: Recatalog incrementally updated image copy in RMAN
For our backup strategy we are using incrementally updated image copies on most Oracle databases. This method can save a lot of time during restore operations, since you don’t need to restore full backup and then apply all the incremental backups, you can either restore the full backup directly (or skip restore operation and switch over to the image copy directly). At the same time, taking backups is as easy and fast as taking incremental backups (in Enterprise Edition block change tracking also helps here).
Today I wanted to change the naming scheme of the incrementally updated image copies, in our case the image copies are stored in NFS, not ASM. I expected it to be straign forward… Rename the files, crosscheck, delete expired and then catalog again (like with normal backupsets). After doing that I tried to update the incremental copy and this is what happened.
First this is my current setup, and my goal was to remove the double dbarep1_ from the beginning of the file name I added there myself wth the backup format string.
SQL> select file#, tag, incremental_level, name from v$datafile_copy where deleted='NO' order by 1;

     FILE# TAG                  INCREMENTAL_LEVEL NAME
---------- -------------------- ----------------- -----------------------------------------------------------------------------------
         1 IMAGE_COPY_BACKUP                    0 /nfs/backup/dbarep1/dbarep1_data_D-DBAREP1_I-1714430310_TS-SYSTEM_FNO-1_r8qjk7v2
         2 IMAGE_COPY_BACKUP                    0 /nfs/backup/dbarep1/dbarep1_data_D-DBAREP1_I-1714430310_TS-SYSAUX_FNO-2_r6qjk7uc
         3 IMAGE_COPY_BACKUP                    0 /nfs/backup/dbarep1/dbarep1_data_D-DBAREP1_I-1714430310_TS-UNDOTBS1_FNO-3_r7qjk7ur
         4 IMAGE_COPY_BACKUP                    0 /nfs/backup/dbarep1/dbarep1_data_D-DBAREP1_I-1714430310_TS-UNDOTBS2_FNO-4_r9qjk7va
         5 IMAGE_COPY_BACKUP                    0 /nfs/backup/dbarep1/dbarep1_data_D-DBAREP1_I-1714430310_TS-USERS_FNO-5_raqjk7vd
         7 IMAGE_COPY_BACKUP                    0 /nfs/backup/dbarep1/dbarep1_data_D-DBAREP1_I-1714430310_TS-SASH_FNO-7_r5qjk7sb

6 rows selected.
Now rename the files to:
data_D-DBAREP1_I-1714430310_TS-SASH_FNO-7_r5qjk7sb
data_D-DBAREP1_I-1714430310_TS-SYSAUX_FNO-2_r6qjk7uc
data_D-DBAREP1_I-1714430310_TS-SYSTEM_FNO-1_r8qjk7v2
data_D-DBAREP1_I-1714430310_TS-UNDOTBS1_FNO-3_r7qjk7ur
data_D-DBAREP1_I-1714430310_TS-UNDOTBS2_FNO-4_r9qjk7va
data_D-DBAREP1_I-1714430310_TS-USERS_FNO-5_raqjk7vd
After renaming I tried to catalog the files again and all looks good at first.
RMAN> crosscheck datafilecopy all;

allocated channel: ORA_DISK_1
channel ORA_DISK_1: SID=216 instance=dbarep11 device type=DISK
validation failed for datafile copy
datafile copy file name=/nfs/backup/dbarep1/dbarep1_data_D-DBAREP1_I-1714430310_TS-SYSTEM_FNO-1_r8qjk7v2 RECID=4001 STAMP=897265906
validation failed for datafile copy
datafile copy file name=/nfs/backup/dbarep1/dbarep1_data_D-DBAREP1_I-1714430310_TS-SYSAUX_FNO-2_r6qjk7uc RECID=4003 STAMP=897265908
validation failed for datafile copy
datafile copy file name=/nfs/backup/dbarep1/dbarep1_data_D-DBAREP1_I-1714430310_TS-UNDOTBS1_FNO-3_r7qjk7ur RECID=4002 STAMP=897265906
validation failed for datafile copy
datafile copy file name=/nfs/backup/dbarep1/dbarep1_data_D-DBAREP1_I-1714430310_TS-UNDOTBS2_FNO-4_r9qjk7va RECID=4000 STAMP=897265905
validation failed for datafile copy
datafile copy file name=/nfs/backup/dbarep1/dbarep1_data_D-DBAREP1_I-1714430310_TS-USERS_FNO-5_raqjk7vd RECID=3999 STAMP=897265901
validation failed for datafile copy
datafile copy file name=/nfs/backup/dbarep1/dbarep1_data_D-DBAREP1_I-1714430310_TS-SASH_FNO-7_r5qjk7sb RECID=4004 STAMP=897265910
Crosschecked 6 objects


RMAN> delete expired datafilecopy all;

released channel: ORA_DISK_1
allocated channel: ORA_DISK_1
channel ORA_DISK_1: SID=216 instance=dbarep11 device type=DISK
List of Datafile Copies
=======================

Key     File S Completion Time Ckp SCN    Ckp Time
------- ---- - --------------- ---------- ---------------
990260  1    X 01-DEC-15       6146800878535 01-DEC-15
        Name: /nfs/backup/dbarep1/dbarep1_data_D-DBAREP1_I-1714430310_TS-SYSTEM_FNO-1_r8qjk7v2
        Tag: IMAGE_COPY_BACKUP

990262  2    X 01-DEC-15       6146800878535 01-DEC-15
        Name: /nfs/backup/dbarep1/dbarep1_data_D-DBAREP1_I-1714430310_TS-SYSAUX_FNO-2_r6qjk7uc
        Tag: IMAGE_COPY_BACKUP

990261  3    X 01-DEC-15       6146800878535 01-DEC-15
        Name: /nfs/backup/dbarep1/dbarep1_data_D-DBAREP1_I-1714430310_TS-UNDOTBS1_FNO-3_r7qjk7ur
        Tag: IMAGE_COPY_BACKUP

990259  4    X 01-DEC-15       6146800878535 01-DEC-15
        Name: /nfs/backup/dbarep1/dbarep1_data_D-DBAREP1_I-1714430310_TS-UNDOTBS2_FNO-4_r9qjk7va
        Tag: IMAGE_COPY_BACKUP

990258  5    X 01-DEC-15       6146800878535 01-DEC-15
        Name: /nfs/backup/dbarep1/dbarep1_data_D-DBAREP1_I-1714430310_TS-USERS_FNO-5_raqjk7vd
        Tag: IMAGE_COPY_BACKUP

990263  7    X 01-DEC-15       6146800878535 01-DEC-15
        Name: /nfs/backup/dbarep1/dbarep1_data_D-DBAREP1_I-1714430310_TS-SASH_FNO-7_r5qjk7sb
        Tag: IMAGE_COPY_BACKUP

Do you really want to delete the above objects (enter YES or NO)? yes
deleted datafile copy
datafile copy file name=/nfs/backup/dbarep1/dbarep1_data_D-DBAREP1_I-1714430310_TS-SYSTEM_FNO-1_r8qjk7v2 RECID=4001 STAMP=897265906
deleted datafile copy
datafile copy file name=/nfs/backup/dbarep1/dbarep1_data_D-DBAREP1_I-1714430310_TS-SYSAUX_FNO-2_r6qjk7uc RECID=4003 STAMP=897265908
deleted datafile copy
datafile copy file name=/nfs/backup/dbarep1/dbarep1_data_D-DBAREP1_I-1714430310_TS-UNDOTBS1_FNO-3_r7qjk7ur RECID=4002 STAMP=897265906
deleted datafile copy
datafile copy file name=/nfs/backup/dbarep1/dbarep1_data_D-DBAREP1_I-1714430310_TS-UNDOTBS2_FNO-4_r9qjk7va RECID=4000 STAMP=897265905
deleted datafile copy
datafile copy file name=/nfs/backup/dbarep1/dbarep1_data_D-DBAREP1_I-1714430310_TS-USERS_FNO-5_raqjk7vd RECID=3999 STAMP=897265901
deleted datafile copy
datafile copy file name=/nfs/backup/dbarep1/dbarep1_data_D-DBAREP1_I-1714430310_TS-SASH_FNO-7_r5qjk7sb RECID=4004 STAMP=897265910
Deleted 6 EXPIRED objects

RMAN> catalog start with '/nfs/backup/dbarep1/data_';

searching for all files that match the pattern /nfs/backup/dbarep1/data_

List of Files Unknown to the Database
=====================================
File Name: /nfs/backup/dbarep1/data_D-DBAREP1_I-1714430310_TS-SYSAUX_FNO-2_r6qjk7uc
File Name: /nfs/backup/dbarep1/data_D-DBAREP1_I-1714430310_TS-USERS_FNO-5_raqjk7vd
File Name: /nfs/backup/dbarep1/data_D-DBAREP1_I-1714430310_TS-UNDOTBS1_FNO-3_r7qjk7ur
File Name: /nfs/backup/dbarep1/data_D-DBAREP1_I-1714430310_TS-UNDOTBS2_FNO-4_r9qjk7va
File Name: /nfs/backup/dbarep1/data_D-DBAREP1_I-1714430310_TS-SYSTEM_FNO-1_r8qjk7v2
File Name: /nfs/backup/dbarep1/data_D-DBAREP1_I-1714430310_TS-SASH_FNO-7_r5qjk7sb

Do you really want to catalog the above files (enter YES or NO)? yes
cataloging files...
cataloging done

List of Cataloged Files
=======================
File Name: /nfs/backup/dbarep1/data_D-DBAREP1_I-1714430310_TS-SYSAUX_FNO-2_r6qjk7uc
File Name: /nfs/backup/dbarep1/data_D-DBAREP1_I-1714430310_TS-USERS_FNO-5_raqjk7vd
File Name: /nfs/backup/dbarep1/data_D-DBAREP1_I-1714430310_TS-UNDOTBS1_FNO-3_r7qjk7ur
File Name: /nfs/backup/dbarep1/data_D-DBAREP1_I-1714430310_TS-UNDOTBS2_FNO-4_r9qjk7va
File Name: /nfs/backup/dbarep1/data_D-DBAREP1_I-1714430310_TS-SYSTEM_FNO-1_r8qjk7v2
File Name: /nfs/backup/dbarep1/data_D-DBAREP1_I-1714430310_TS-SASH_FNO-7_r5qjk7sb
RMAN shows that the datafile copies are nicely registered, with a correct tag:
RMAN> list datafilecopy all;

List of Datafile Copies
=======================

Key     File S Completion Time Ckp SCN    Ckp Time
------- ---- - --------------- ---------- ---------------
991836  1    A 01-DEC-15       6146800878535 01-DEC-15
        Name: /nfs/backup/dbarep1/data_D-DBAREP1_I-1714430310_TS-SYSTEM_FNO-1_r8qjk7v2
        Tag: IMAGE_COPY_BACKUP

991832  2    A 01-DEC-15       6146800878535 01-DEC-15
        Name: /nfs/backup/dbarep1/data_D-DBAREP1_I-1714430310_TS-SYSAUX_FNO-2_r6qjk7uc
        Tag: IMAGE_COPY_BACKUP

991834  3    A 01-DEC-15       6146800878535 01-DEC-15
        Name: /nfs/backup/dbarep1/data_D-DBAREP1_I-1714430310_TS-UNDOTBS1_FNO-3_r7qjk7ur
        Tag: IMAGE_COPY_BACKUP

991835  4    A 01-DEC-15       6146800878535 01-DEC-15
        Name: /nfs/backup/dbarep1/data_D-DBAREP1_I-1714430310_TS-UNDOTBS2_FNO-4_r9qjk7va
        Tag: IMAGE_COPY_BACKUP

991833  5    A 01-DEC-15       6146800878535 01-DEC-15
        Name: /nfs/backup/dbarep1/data_D-DBAREP1_I-1714430310_TS-USERS_FNO-5_raqjk7vd
        Tag: IMAGE_COPY_BACKUP

991837  7    A 01-DEC-15       6146800878535 01-DEC-15
        Name: /nfs/backup/dbarep1/data_D-DBAREP1_I-1714430310_TS-SASH_FNO-7_r5qjk7sb
        Tag: IMAGE_COPY_BACKUP
And then thinking all is good I tried to refresh that copy, this is what happened:
RMAN> backup incremental level 1 for recover of copy with tag 'image_copy_backup' database;

Starting backup at 01-DEC-15
using channel ORA_DISK_1
no parent backup or copy of datafile 7 found
no parent backup or copy of datafile 2 found
no parent backup or copy of datafile 3 found
no parent backup or copy of datafile 1 found
no parent backup or copy of datafile 4 found
no parent backup or copy of datafile 5 found
channel ORA_DISK_1: starting datafile copy
input datafile file number=00007 name=+DATA/dbarep1/datafile/sash.286.779298095
...
RMAN thinks that there is no image copy to update and tries to create a new full image copy! If you have >20TB databases it is an expensive price to pay 🙂
Lets query the data dictionary directly to see more information about the datafilecopy that was registered:
SQL> select file#, tag, incremental_level, name from v$datafile_copy where deleted='NO' order by 1;

     FILE# TAG                  INCREMENTAL_LEVEL NAME
---------- -------------------- ----------------- -----------------------------------------------------------------------------------
         1 IMAGE_COPY_BACKUP                      /nfs/backup/dbarep1/data_D-DBAREP1_I-1714430310_TS-SYSTEM_FNO-1_r8qjk7v2
         2 IMAGE_COPY_BACKUP                      /nfs/backup/dbarep1/data_D-DBAREP1_I-1714430310_TS-SYSAUX_FNO-2_r6qjk7uc
         3 IMAGE_COPY_BACKUP                      /nfs/backup/dbarep1/data_D-DBAREP1_I-1714430310_TS-UNDOTBS1_FNO-3_r7qjk7ur
         4 IMAGE_COPY_BACKUP                      /nfs/backup/dbarep1/data_D-DBAREP1_I-1714430310_TS-UNDOTBS2_FNO-4_r9qjk7va
         5 IMAGE_COPY_BACKUP                      /nfs/backup/dbarep1/data_D-DBAREP1_I-1714430310_TS-USERS_FNO-5_raqjk7vd
         7 IMAGE_COPY_BACKUP                      /nfs/backup/dbarep1/data_D-DBAREP1_I-1714430310_TS-SASH_FNO-7_r5qjk7sb

6 rows selected.
Incremental level is NULL! Catalog start with command did not register the datafiles as a base of incremental backup. CATALOG START WITH was a wrong command to use. To register datafilecopy properly for incremental updates, there is a separate catalog command: CATALOG DATAFILECOPY ‘filename’ LEVEL 0 TAG ‘tagname’;
First I remove the invalid registrations:
change datafilecopy '/nfs/backup/dbarep1/data_D-DBAREP1_I-1714430310_TS-SYSAUX_FNO-2_r6qjk7uc' uncatalog;
change datafilecopy '/nfs/backup/dbarep1/data_D-DBAREP1_I-1714430310_TS-USERS_FNO-5_raqjk7vd' uncatalog;
change datafilecopy '/nfs/backup/dbarep1/data_D-DBAREP1_I-1714430310_TS-UNDOTBS1_FNO-3_r7qjk7ur' uncatalog;
change datafilecopy '/nfs/backup/dbarep1/data_D-DBAREP1_I-1714430310_TS-UNDOTBS2_FNO-4_r9qjk7va' uncatalog;
change datafilecopy '/nfs/backup/dbarep1/data_D-DBAREP1_I-1714430310_TS-SYSTEM_FNO-1_r8qjk7v2' uncatalog;
change datafilecopy '/nfs/backup/dbarep1/data_D-DBAREP1_I-1714430310_TS-SASH_FNO-7_r5qjk7sb' uncatalog;
And then register the datafilecopy properly:
catalog datafilecopy '/nfs/backup/dbarep1/data_D-DBAREP1_I-1714430310_TS-SASH_FNO-7_r5qjk7sb' level 0 tag 'IMAGE_COPY_BACKUP';
catalog datafilecopy '/nfs/backup/dbarep1/data_D-DBAREP1_I-1714430310_TS-SYSAUX_FNO-2_r6qjk7uc' level 0 tag 'IMAGE_COPY_BACKUP';
catalog datafilecopy '/nfs/backup/dbarep1/data_D-DBAREP1_I-1714430310_TS-SYSTEM_FNO-1_r8qjk7v2' level 0 tag 'IMAGE_COPY_BACKUP';
catalog datafilecopy '/nfs/backup/dbarep1/data_D-DBAREP1_I-1714430310_TS-UNDOTBS1_FNO-3_r7qjk7ur' level 0 tag 'IMAGE_COPY_BACKUP';
catalog datafilecopy '/nfs/backup/dbarep1/data_D-DBAREP1_I-1714430310_TS-UNDOTBS2_FNO-4_r9qjk7va' level 0 tag 'IMAGE_COPY_BACKUP';
catalog datafilecopy '/nfs/backup/dbarep1/data_D-DBAREP1_I-1714430310_TS-USERS_FNO-5_raqjk7vd' level 0 tag 'IMAGE_COPY_BACKUP';
After that incremental update worked again.
Archives: Putting Data Guard traffic on dedicated network interface
I recently had an interesting challenge to direct data guard network traffic over a dedicated network interface and not go though the main network routes. The reason was that in order to reach the remote datacenter, the dataguard traffic should be sent via WAN optimizer network, that will automatically compress and dedup all traffic (hard to believe, that there are still some places left in Europe, where internet bandwidth is extremely expensive). I know that Oracle since 11.2 can do redo compression for data guard traffic also, but this requires advanced compression option and also uses database host CPU-s to do the compression, WAN optimizer software licenses are cheaper and usable for other tasks as well.
The following tasks need to be completed:
- Configure a new network interface in OS. I’m not going to discuss it here, but it is a prerequisite for any tasks to be done in Oracle.
- Configure the new network for Oracle listener. If you are using standalone database and haven’t got some special configuration for you listener, then it should already listen on the new network interface also. RAC needs special attention and it is described in this blog post. Basically you need to configure new set of VIP addresses, create a new network resource in clusterware and configure database instance to register on the new network. SCAN address cannot be created on the additional network.
- Configure Data Guard to communicate over the newly created network. The necessary steps are described below and I’m assuming that Data Guard Broker is in use.
My database setup is the following: primary database is RAC (prd_db_rac) and it has two physical standbys, one local (prd) and one remote (prd_wan1).
$ ORACLE_SID=prd dgmgrl /
DGMGRL for Linux: Version 11.2.0.4.0 - 64bit Production

Copyright (c) 2000, 2009, Oracle. All rights reserved.

Welcome to DGMGRL, type "help" for information.
Connected.
DGMGRL> show configuration

Configuration - prd

  Protection Mode: MaxPerformance
  Databases:
    prd_db_rac - Primary database
    prd        - Physical standby database
    prd_wan1   - Physical standby database

Fast-Start Failover: DISABLED

Configuration Status:
SUCCESS
Now lets look at the properties of one of the databases.
DGMGRL> show database verbose prd_wan1;

Database - prd_wan1

  Enterprise Manager Name: prd_wan1.prod.example.com
  Role:                    PHYSICAL STANDBY
  Intended State:          APPLY-ON
  Transport Lag:           0 seconds (computed 1 second ago)
  Apply Lag:               0 seconds (computed 0 seconds ago)
  Apply Rate:              3.08 MByte/s
  Real Time Query:         ON
  Instance(s):
    prd

  Properties:
    DGConnectIdentifier             = '//oc1dg2.wan1.example.com/prd_wan1.prod.example.com'
    ObserverConnectIdentifier       = ''
    LogXptMode                      = 'ASYNC'
    DelayMins                       = '0'
    Binding                         = 'optional'
    MaxFailure                      = '0'
    MaxConnections                  = '1'
    ReopenSecs                      = '300'
    NetTimeout                      = '30'
    RedoCompression                 = 'DISABLE'
    LogShipping                     = 'ON'
    PreferredApplyInstance          = ''
    ApplyInstanceTimeout            = '0'
    ApplyParallel                   = 'AUTO'
    StandbyFileManagement           = 'AUTO'
    ArchiveLagTarget                = '0'
    LogArchiveMaxProcesses          = '4'
    LogArchiveMinSucceedDest        = '1'
    DbFileNameConvert               = ''
    LogFileNameConvert              = ''
    FastStartFailoverTarget         = ''
    InconsistentProperties          = '(monitor)'
    InconsistentLogXptProps         = '(monitor)'
    SendQEntries                    = '(monitor)'
    LogXptStatus                    = '(monitor)'
    RecvQEntries                    = '(monitor)'
    ApplyLagThreshold               = '0'
    TransportLagThreshold           = '0'
    TransportDisconnectedThreshold  = '30'
    SidName                         = 'prd'
    StaticConnectIdentifier         = '(DESCRIPTION=(ADDRESS=(PROTOCOL=tcp)(HOST=oc1dg2.wan1.example.com)(PORT=1521))(CONNECT_DATA=(SERVICE_NAME=prd_wan1_DGMGRL.prod.example.com)(INSTANCE_NAME=prd)(SERVER=DEDICATED)))'
    StandbyArchiveLocation          = 'USE_DB_RECOVERY_FILE_DEST'
    AlternateLocation               = ''
    LogArchiveTrace                 = '0'
    LogArchiveFormat                = '%t_%s_%r.dbf'
    TopWaitEvents                   = '(monitor)'

Database Status:
SUCCESS
Each database in the broker configuration has a property telling how other databases in the same broker configuration can connect and send redo to it. This parameter is the first on the list – DGConnectIdentifier. All we need to do is change this property to point to an address in the new network. For single instance databases this is easy task, we can use the easy connect syntax, so for my case need to change the physical standby connection string as follows (sb. prefix in host names are located in the new wan optimized network).
DGMGRL> EDIT DATABASE prd SET PROPERTY 'DGConnectIdentifier'='//sb.oc1dg1.prod.example.com/prd.prod.example.com';
Property "DGConnectIdentifier" updated.

DGMGRL> EDIT DATABASE prd_wan1 SET PROPERTY 'DGConnectIdentifier'='//sb.oc1dg2.wan1.example.com/prd_wan1.prod.example.com';
Property "DGConnectIdentifier" updated.
The same property needs to be changed for primary database also, but short SCAN address cannot be created for the secondary network and in broker the property value string cannot be long enough to hold the full RAC connection string for my configuration. So I needed to add the following entry to tnsnames.ora for all Oracle Homes involved in that configuration (both primary and all standbys). Here again, sb part of the DNS name refers to IP on the new network.
PRD_DB_RAC_SB =
  (DESCRIPTION =
    (ADDRESS_LIST=
      (ADDRESS= (PROTOCOL = TCP)(HOST = oc1n01-sb-vip.prod.example.com)(PORT = 1521))
      (ADDRESS= (PROTOCOL = TCP)(HOST = oc1n02-sb-vip.prod.example.com)(PORT = 1521))
      (ADDRESS= (PROTOCOL = TCP)(HOST = oc1n03-sb-vip.prod.example.com)(PORT = 1521))
      (ADDRESS= (PROTOCOL = TCP)(HOST = oc1n04-sb-vip.prod.example.com)(PORT = 1521))
      (FAILOVER = on)
    ) (CONNECT_DATA=
     (SERVICE_NAME = prd_db_rac.prod.example.com)
  ))
Now I can make the same Broker property change for primary RAC database also.
DGMGRL> EDIT DATABASE prd_db_rac SET PROPERTY 'DGConnectIdentifier'='PRD_DB_RAC_SB';
Property "DGConnectIdentifier" updated.
That was all, no need to restart anything, after property change Broker changes automatically the instance parameters itself. We did this change in order to replace the old SAN based replication to remote datacenter with Data Guard and to save on bandwidth we needed to run the Data Guard traffic through separate WAN optimized network. On the average we see that the WAN optimizer compresses Data Guard traffic about 3-4 times and compared to the old SAN replication setup (SAN did compress the change log also internally before sending it to the remote site) we use about 2 times less bandwidth (or actually more, since we were previously limiting SAN replication bandwidth, during the day it always ran on the limit and caught up during the night). Considering how much internet bandwidth costs on some places, the extra Data Guard license needed will pay for itself in surprisingly short time in reduced Internet bandwidth alone (not calculating the extra features it also brings, like Active Data Guard).
Archives: Setting up SQL Developer with Instant Client on MacOSX
Since I started a new job I also wanted to try out MacBook as my new laptop. I’ve never been a Mac user, but there seems to be a large group of people who think Macs are the best, so I needed to find out the goodness of Macs myself 🙂 A quick tip: Don’t upgrade to Yosemite if you laptop is bound to Active Directory.
One part of setting up my new laptop was also setting up SQL Developer WITH Oracle Driver, because a year or two ago I rolled out radius authentication for all users who need to access the production databases directly and radius (and other non-default-password authentication schemes) do not work with thin JDBC driver. Being new to Macworld and not finding any guides for this task online, it was quite a struggle in the beginning. Here I’m trying to share my experiences if anybody else find themselves in the similar situation. If you find any mistakes here, please let me know – I’m new to the world of MacOS 🙂
Jan Karremans just today published a similar article about Mac and Instant client, but the goal of my blog post is to get SQL Developer connected through Instant Client.
JDK
First you need Java installed, I installed 64-bit JDK8, but it would be better to install 64-bit JDK7, since SQL Developer 4.0 is not supported on JDK8.
SQL Developer
When I’m writing this, SQL Developer 4.1 is in Early Adopter release and 4.0 is in production. I installed SQL Developer 4.0.3.
Oracle Instant Client
There is another reason to choose SQL Developer 4.0 over 4.1 – 4.1 requires version 12.1 of the Oracle Client and that is not yet released for MacOS. SQL Developer 4.0 requires Oracle Client 11.2.0.3 and that is available for MacOS. I downloaded Instant Client 11.2.0.3 (64-bit – since I installed 64-bit JDK): instantclient-basic-macos.x64-11.2.0.3.0.zip and instantclient-sqlplus-macos.x64-11.2.0.3.0.zip to be precise. I unzipped both these files under /opt so my Instant Client installation directory is /opt/instantclient_11_2. After unzipping, Instant Client installation instructions require creating the following symlinks:
Configuring SQL Developer
Open SQL Developer, open Preferences and go to Database > Advanced. Configure Oracle Client paths and check Use Oracle Client and Use OCI/Thick driver boxes. Here is the sample screenshot from my settings.
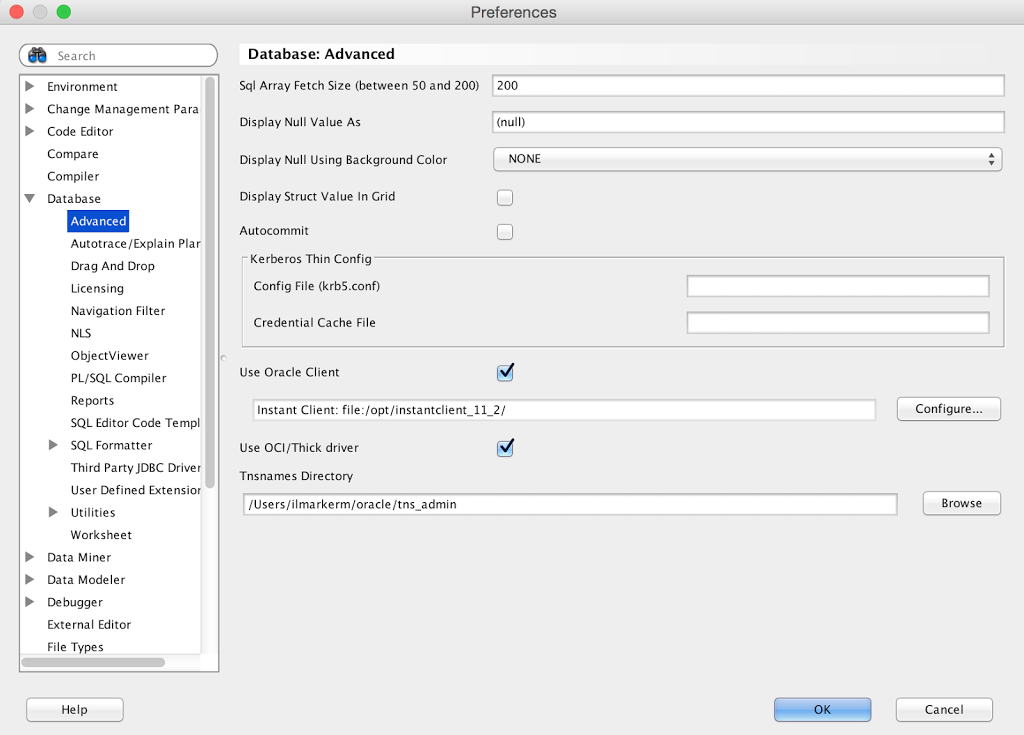
When you press the Configure button to set the Oracle client path, there is also a button to Test if the Client was loaded correctly. Currently this test should fail.
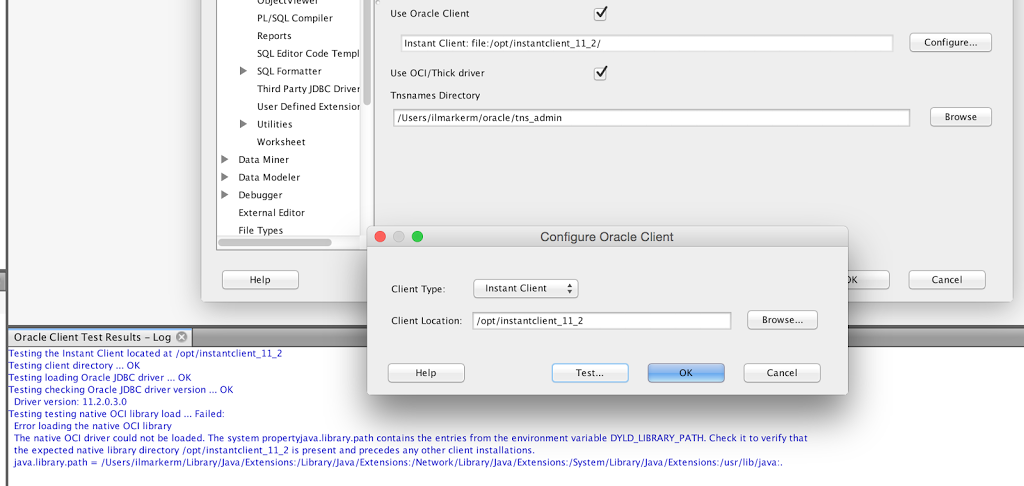
Setting the environment variables
We need to set two environment variables: DYLD_LIBRARY_PATH to make sure applications can find and load the instant client libraries and TNS_ADMIN so instant client could find sqlnet.ora and tnsnames.ora files. In my case sqlnet.ora is essential, since I need to use Radius authentication.
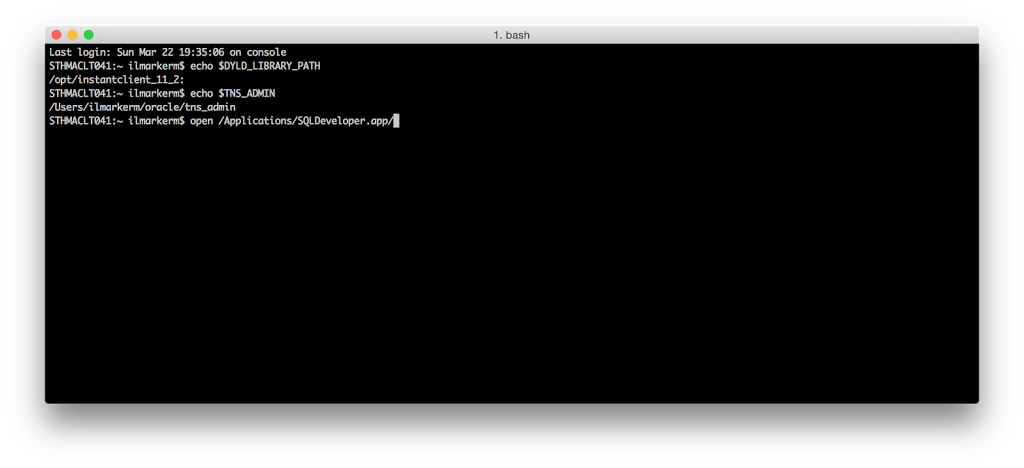
First I added these environment variables to ~/.profile:
After restarting terminal and verifying that these environment variables are indeed set, execute SQL Developer app directly from terminal by executing open /Applications/SQLDeveloper.app/.
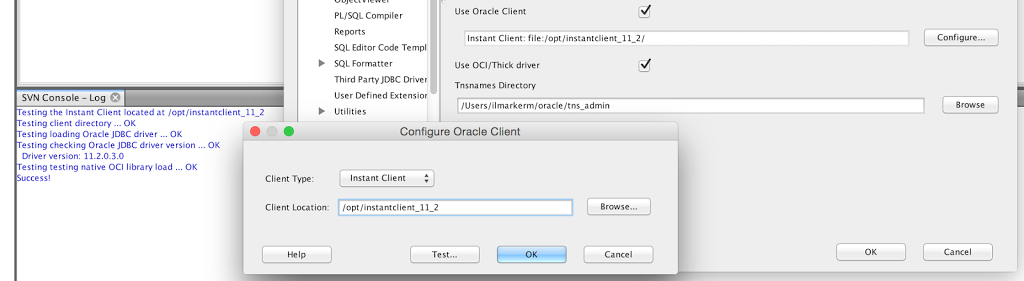
Open preferences and press the Oracle Client Test button again, now the test should succeed and SQL Developer is connected through Instant Client.
All good! Great success! Guess again… Close SQL Developer and launch it from Docker/Launchpad and you will see the Oracle Client test failing again. This is because the environment variables under ~/.profile or ~/.bash_profile are loaded only inside Terminal.
Setting environment variables on login
This seems to be the most complex part of this story since it seems to change with every MacOS release. The method that is working for me under Yosemite (and in no way am I declaring that it is the best method, I am a Mac newbie after all), is this:
Open application Script Editor and paste the following AppleScript there:
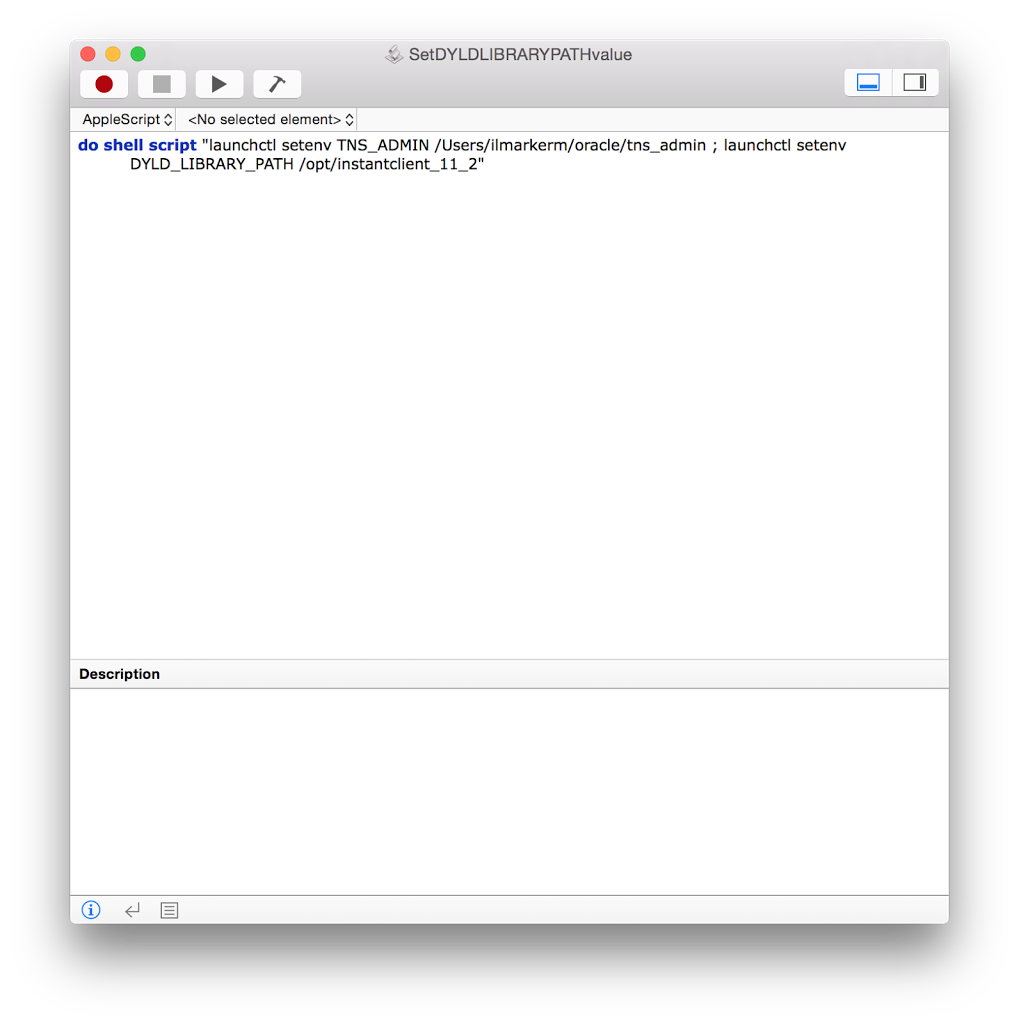
Yes, it is also necessary to set TNS_ADMIN, since setting the TNS admin directory path under SQL Developer preferences does not work if you need to use specific settings in sqlnet.ora, for example authentication.
Save the script and in the save dialog set File format: Application. And finally System settings -> Users & Groups -> Login items press + sign and select the application you just saved. Now, log out from MacOS and log back in. Now SQL Developer should work with Instant Client even when you launch it from Launchpad.
I got this method from a Stackoverflow thread.
Archives: Script to delete multipathed ASMLIB storage devices from Linux
Before storage device can be removed (or unassigned) from server, it must first be removed from Linux. This is even more necessary if the server is running Oracle ASMLib, because if there are any removed or read-only storage devices present when running service oracleasm scandisks, the command will just hang and server load will start to increase (maximum I’ve seen was 3500).
Here you find RedHat instructions on how to cleanly remove storage devices in RHEL6. A lot of steps, especially when running multipath and having multiple paths to each device.
Since we do database replication and cloning to test using storage replication, then assigning and unassigning storage devices from test servers is quite frequent and if not done properly and cleanly, we have to reboot the server. Here is a little script to help with that task. It takes ASMLib disk names to be removed as an argument, finds all paths to the device and removes them from Linux.
Tested in OEL5 (using RHEL kernel) and OEL6 (using UEK2 kernel). This script only deals with dm-* and sd* devices, so before using please check and modify the script for your environment. Before removing the storage devices from Linux, make sure that the disk groups are dismounted from ASM and they are not used.
Categories
- Blog entry
 (103)
(103)
- Event (5)