Archives: ORDS on port 443
Oracle Rest Data Services (ORDS) is a HTTP frontend for various Oracle Database related tasks – database admin APIs, SQL Developer web and most famously ofcourse APEX. It is a java program and for a few years now it comes with a built in Jetty web server that is recommended to use for production workloads – without Tomcat, Weblogic or any other Java servlet container.
All the setup guides for ORDS in the Internet start ORDS usually on port 8443, or any other high port. But the default port for HTTPS is 443. If ORDS should be used without any additional web server/proxy, then wouldn’t it be nice to use the default HTTPS port already directly for ORDS?
This brings a little problem – Linux does not allow non-privileged users to open ports lower than 1024 and I really do not think it is a good idea to run ORDS as root.
The easiest way to achieve this I’ve found is to just use FirewallD to create an internal port-forward. I’ve tested this on Oracle Linux 8.
As an one-time operation, as root, configure FirewallD to allow incoming port 443 and then forward all traffic from 443 to 8443.
firewall-cmd --add-port=443/tcp --permanent
firewall-cmd --add-forward-port=port=443:proto=tcp:toport=8443 --permanent
firewall-cmd --reload
Then, start ORDS normally on port 8443, using non-privileged user.
Archives: Validating JWT tokens with RS256 signatures in PL/SQL
JSON Web Token (JWT) is a popular open standard that enables web applications to transfer information between parties asn JSON object. For example single-sign on authentication information. The information can be trusted, because the token also includes a signature. Verifying this signature is essential, otherwise anyone can fake the token contents.
Oracle APEX does provide APEX_JWT package, which handles the parsing and validity checking very well, but it can only verify the signature, if JWT was created using HS256 signature. HS256 is loosing popularity, since it is based on symmetric cryptography, meaning all parties must have access to the same encryption key.
Another, much more secure signature is now gaining popularity, based on RSA public key encryption – RS256. Here JWT is signed using a private key, but it can be verified using the corresponding public key. As the name suggests, public key is completely public and can be downloaded from the internet using kid attribute value present in JWT header (this service is called JWKS – JSON Web Key Sets). This is also the signature system AWS Cognito uses.
At the time of writing (APEX 23.1 and Oracle database 19.20), I did not find and ready code on the internet for verifying JWT RS256 signatures – so I had to create one. It lets APEX_JWT do the JWT parsing and validity checking, but I needed to add RS256 signature checking and downloading keys from JWKS store. It is intended to be used from APEX flows.
APEX_JWT_RS256 package repository can be found here
A quick example how to use the package as APEX page sentry function in custom authentication scheme.
create or replace FUNCTION JWT_PAGE_SENTRY RETURN BOOLEAN AS
    v_required_group varchar2(30):= 'important_people'; -- Group needed to access the app
    v_iss varchar2(200):= 'https://cognito-idp.eu-central-1.amazonaws.com/eu-central-1_ZZxxZZxx11'; -- ISS that issued the JWT, YOU MUST CHANGE THIS to point to your own ISS
    jwt_cookie owa_cookie.cookie;
    v_jwt_payload varchar2(2000);
    v_jwt_json json_object_t;
    v_groups json_array_t;
    v_group_found boolean:= false;
BEGIN
    -- Do JWT token validation and check that correct group is granted to user
    -- 2023 Ilmar Kerm
    jwt_cookie:= owa_cookie.get('JWT_COOKIE_NAME');
    IF jwt_cookie.vals.COUNT = 0 THEN
        apex_debug.error('JWT session cookie not found');
        RETURN false;
    END IF;
    IF apex_jwt_rs256.decode_and_validate(jwt_cookie.vals(1), v_iss, v_jwt_payload) THEN
        -- JWT validated, now check the required group
        v_jwt_json:= json_object_t.parse(v_jwt_payload);
        v_groups:= v_jwt_json.get_array('cognito:groups');
        FOR i IN 0..v_groups.get_size - 1 LOOP
            IF v_groups.get_string(i) = v_required_group THEN
                v_group_found:= true;
                EXIT;
            END IF;
        END LOOP;
        IF NOT v_group_found THEN
            apex_debug.error('Required group is missing from JWT: '||v_required_group);
            RETURN false;
        END IF;
        IF v_jwt_json.get_string('token_use') != 'access' THEN
            apex_debug.error('Invalid value for JWT attribute token_use');
            RETURN false;
        END IF;
        IF V('APP_USER') IS NULL OR V('APP_USER') = 'nobody' OR V('APP_USER') != v_jwt_json.get_string('username') THEN
            APEX_CUSTOM_AUTH.DEFINE_USER_SESSION(
                p_user => v_jwt_json.get_string('username'),
                p_session_id => APEX_CUSTOM_AUTH.GET_NEXT_SESSION_ID
            );
        END IF;
        RETURN true;
    ELSE
        RETURN false;
    END IF;
END JWT_PAGE_SENTRY;
Archives: DBMS_SCHEDULER agent in 19c #JoelKallmanDay
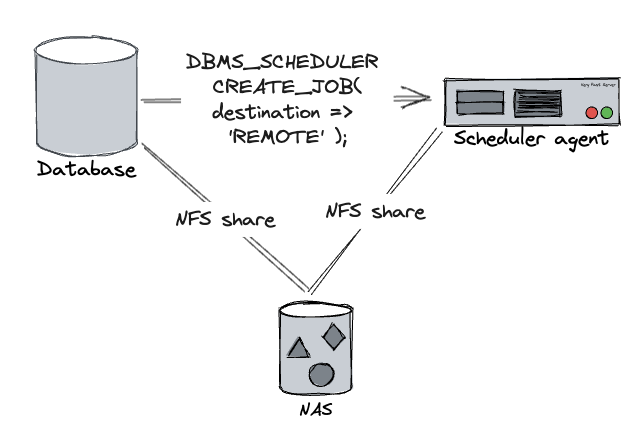
Scheduler agent is a way to execute external programs from database DBMS_SCHEDULER on a remote host. I started using it after analytics teams started using OS scripts more and more heavily and their team grew more and more and they started making demands what OS packages to install and making restrictions on database server OS upgrades. And sometimes their OS scripts started to consume more resources or just hung. Enough was enough, no developer can log into database server, none of their scripts can execute on the database host.
Oracle created a solution for that in 11.2 – Scheduler agent – a small java application that executes programs on the DBMS_SCHEDULER behalf and communicates back the results. When creating an executable scheduler job, you can specify DESTINATION_NAME parameter and instead of database host the external script would be executed on a remote host instead, while keeping all the existing functionality – scheduler would know when script execution finished and would also get its exit code, stdout and stderr. Often these scripts were used to download a remote file that later was processed using Oracle external table – so the script execution server and database had to use the same filesystem – we used NFS share from a central NAS.
All worked perfectly, no hiccups in 11.2 and 12.1. But then came 19c and Oracle added a restriction that when registering database on the scheduler agent side, database and scheduler agent versions must match exactly – but at the same time there were multiple bugs where they never seemed to bother to update the version strings properly – so it was rather impossible to register >19.3 database without going through Oracle support for a few years. And the official scheduler agent installation documentation is still incorrect.
Here is how to set up scheduler agent in current 19c versions (tested with 19.18, 19.19, 19.20).
On the database server, on the database ORACLE_HOME generate the execution agent package. It does not have to be the same database home that will connect to the agent, just the same version is enough (same RU). This is a self-contained zip file that contains everything needed (including JRE) to run the scheduler agent on a remote host.
# Check that ORACLE_HOME and ORACLE_SID are set properly
# If ORACLE_SID is incorrect extjobo will return "ORACLE_SID not found"

# NB! For some reason I also get "ORACLE_SID not found" when running the
# command under RAC database home with correct ORACLE_SID set!
# Works fine under single instance database home (and host running only one instance)

$ echo $ORACLE_SID
qa1i1
$ echo $ORACLE_HOME
/u01/app/oracle/product/19-db-19201

# Create the scheduler agent package
$ORACLE_HOME/bin/extjobo -createagentzip /tmp/execution_agent.zip
Transport /tmp/execution_agent.zip to the scheduler agent host and unzip it.
cd /u01/app/oracle/product
unzip /tmp/execution_agent.zip

# as root
/u01/app/oracle/product/execution_agent/root.sh
To configure the scheduler agent, edit file /u01/app/oracle/product/execution_agent/schagent.conf. At minimum, edit the PORT value (port where scheduler agent will listen for incoming requests – needs to be open for the database server). I would also recommend changing AGENT_NAME, by default this will be agent server hostname, but you probably want to move it around between different servers and still keep the same destination name on database side.
In order to start the scheduler agent automatically, SystemD unit file will be helpful. Create file /etc/systemd/system/scheduleragent.service
[Unit]
Description=Oracle 19c scheduler agent
After=syslog.target network.target

[Service]
User=oracle
Group=oinstall
Restart=on-failure
RestartSec=30
Type=forking
PIDFile=/u01/app/oracle/product/execution_agent/data/agent.pid

# Systemd version 231 adds support for + prefix (running with privileged user)
ExecStartPre=+/usr/bin/touch /u01/app/oracle/product/execution_agent/data/pendingjobs.dat
ExecStartPre=+/bin/chown oracle:oinstall /u01/app/oracle/product/execution_agent/data/pendingjobs.dat
ExecStart=/u01/app/oracle/product/execution_agent/bin/schagent -start
ExecStop=/u01/app/oracle/product/execution_agent/bin/schagent -stop

[Install]
WantedBy=multi-user.target
Enable and start the scheduleragent service
# as root
systemctl daemon-reload
systemctl enable scheduleragent
systemctl start scheduleragent
After that you can register database target using the regular /u01/app/oracle/product/execution_agent/bin/schagent -registerdatabase command. Agent log is in file /u01/app/oracle/product/execution_agent/data/agent.log. To increase logging verbosity change LOGGING_LEVEL=ALL in schagent.conf and restart the agent.
Archives: Azure SSO from Oracle APEX with group membership
Tim has written an excellent blog post on how to connect your APEX application with Azure SSO. I used this article as a base with my work, with a few modifications.
You can also set Authentication provider to OpenID Connect Provider, then you only have to supply one Azure SSO configuration URL, everything else will be automatically configured. Documentation is here. You can configure like that:
- Authentication provider: OpenID Connect Provider
- Discovery URL: https://login.microsoftonline.com/your_Azure_AD_tenant_UUID_here/v2.0/.well-known/openid-configuration
For Oracle Wallet setup, you can use my solution to automatically convert Linux system trusted certificates to Oracle Wallet format.
Another requirement for me was to make some Azure user group membership available for the APEX application. One option to query this from APEX is to make a post authentication call to Azure GraphQL endpoint /me/memberOf. For this to work, Azure administrator needs to grant your application User.Read privilege at minimum. Then /me/memberOf will list you only the group object ID-s that the logged in user is a member, but no group names nor other information (if you require to see group names, then your application also needs Group.Read.All permission, but for my case it required approvals and more red tape that I really did not want to go through).
The solution below is to create APEX post authentication procedure that will store the Azure enabled roles in APEX user session collection APP_USER_ENABLED_ROLES. Afterwards you can use the collection in APEX application as you see fit, also use it in APEX authorization schemes.
Archives: Convert Linux system CA trust store to Oracle Wallet file
If you need to make HTTPS requests (or other TLS secured network requests) from Oracle database, you also need a wallet containing the certification authority (CA) certificates you trust. In todays distributed web world it is quite painful to keep updated. But operating systems and popular web browsers already come with bundled trust lists – the certificate authorities the OS vendor has considered trustworthy according to their policies. Wouldn’t it be nice to make it usable for Oracle Database?
Enterprise linuxes have package ca-certificates that contain the CA-s Mozilla has deemed trustworthy, this is available in file /etc/pki/ca-trust/extracted/pem/tls-ca-bundle.pem
Oracle Wallet is basically PKCS#12 container, so we can just use standard openssl command to generate it.
I tested it with Oracle Database 19.18 and it accepted the generated file without any problems.
Categories
- Blog entry
 (103)
(103)
- Event (5)