Tag: JoelKallmanDay
- Written by: ilmarkerm
- Category: Blog entry
- Published: October 11, 2023
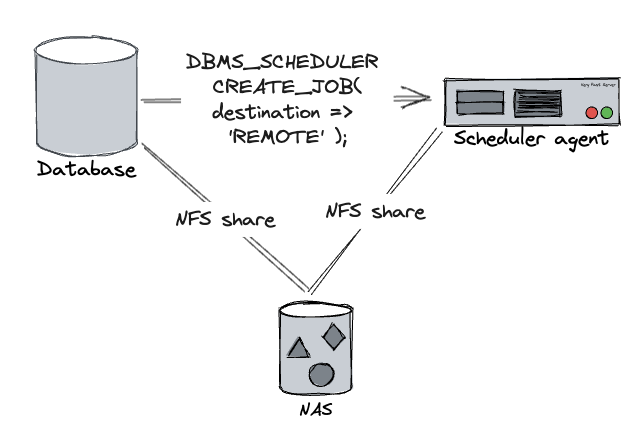
Scheduler agent is a way to execute external programs from database DBMS_SCHEDULER on a remote host. I started using it after analytics teams started using OS scripts more and more heavily and their team grew more and more and they started making demands what OS packages to install and making restrictions on database server OS upgrades. And sometimes their OS scripts started to consume more resources or just hung. Enough was enough, no developer can log into database server, none of their scripts can execute on the database host.
Oracle created a solution for that in 11.2 – Scheduler agent – a small java application that executes programs on the DBMS_SCHEDULER behalf and communicates back the results. When creating an executable scheduler job, you can specify DESTINATION_NAME parameter and instead of database host the external script would be executed on a remote host instead, while keeping all the existing functionality – scheduler would know when script execution finished and would also get its exit code, stdout and stderr. Often these scripts were used to download a remote file that later was processed using Oracle external table – so the script execution server and database had to use the same filesystem – we used NFS share from a central NAS.
All worked perfectly, no hiccups in 11.2 and 12.1. But then came 19c and Oracle added a restriction that when registering database on the scheduler agent side, database and scheduler agent versions must match exactly – but at the same time there were multiple bugs where they never seemed to bother to update the version strings properly – so it was rather impossible to register >19.3 database without going through Oracle support for a few years. And the official scheduler agent installation documentation is still incorrect.
Here is how to set up scheduler agent in current 19c versions (tested with 19.18, 19.19, 19.20).
On the database server, on the database ORACLE_HOME generate the execution agent package. It does not have to be the same database home that will connect to the agent, just the same version is enough (same RU). This is a self-contained zip file that contains everything needed (including JRE) to run the scheduler agent on a remote host.
# Check that ORACLE_HOME and ORACLE_SID are set properly
# If ORACLE_SID is incorrect extjobo will return "ORACLE_SID not found"

# NB! For some reason I also get "ORACLE_SID not found" when running the
# command under RAC database home with correct ORACLE_SID set!
# Works fine under single instance database home (and host running only one instance)

$ echo $ORACLE_SID
qa1i1
$ echo $ORACLE_HOME
/u01/app/oracle/product/19-db-19201

# Create the scheduler agent package
$ORACLE_HOME/bin/extjobo -createagentzip /tmp/execution_agent.zip
Transport /tmp/execution_agent.zip to the scheduler agent host and unzip it.
cd /u01/app/oracle/product
unzip /tmp/execution_agent.zip

# as root
/u01/app/oracle/product/execution_agent/root.sh
To configure the scheduler agent, edit file /u01/app/oracle/product/execution_agent/schagent.conf. At minimum, edit the PORT value (port where scheduler agent will listen for incoming requests – needs to be open for the database server). I would also recommend changing AGENT_NAME, by default this will be agent server hostname, but you probably want to move it around between different servers and still keep the same destination name on database side.
In order to start the scheduler agent automatically, SystemD unit file will be helpful. Create file /etc/systemd/system/scheduleragent.service
[Unit]
Description=Oracle 19c scheduler agent
After=syslog.target network.target

[Service]
User=oracle
Group=oinstall
Restart=on-failure
RestartSec=30
Type=forking
PIDFile=/u01/app/oracle/product/execution_agent/data/agent.pid

# Systemd version 231 adds support for + prefix (running with privileged user)
ExecStartPre=+/usr/bin/touch /u01/app/oracle/product/execution_agent/data/pendingjobs.dat
ExecStartPre=+/bin/chown oracle:oinstall /u01/app/oracle/product/execution_agent/data/pendingjobs.dat
ExecStart=/u01/app/oracle/product/execution_agent/bin/schagent -start
ExecStop=/u01/app/oracle/product/execution_agent/bin/schagent -stop

[Install]
WantedBy=multi-user.target
Enable and start the scheduleragent service
# as root
systemctl daemon-reload
systemctl enable scheduleragent
systemctl start scheduleragent
After that you can register database target using the regular /u01/app/oracle/product/execution_agent/bin/schagent -registerdatabase command. Agent log is in file /u01/app/oracle/product/execution_agent/data/agent.log. To increase logging verbosity change LOGGING_LEVEL=ALL in schagent.conf and restart the agent.