Tag: oracle
- Written by: ilmarkerm
- Category: Blog entry
- Published: November 6, 2024
I’m forced to write my first JavaScript related post 🙁 Oh, well.
ORDS version at the time of writing is 24.3.
Oracle Rest Data Services (ORDS) does support (currently read-only) GraphQL protocol for serving data from Oracle rest enabled tables. You can read more about it here: https://oracle-base.com/articles/misc/oracle-rest-data-services-ords-graphql
To get GraphQL support working, ORDS need to be running using GraalVM JDK – but it’s not as simple as switching the JDK – GraalVM also needs to support JavaScript polyglot engine. When I started looking into this world I was properly confused, starting with naming – ORDS 24.3 installation checklist still requires GraalVM Enterprise Edition and when going to search for it find man-bear-pigs like GraalVM-EE-23-for-JDK-17. Properly confusing for a non-developer like me.
Luckily naming has been significantly simplified recently and GraalVM EE is dead
Naming starting from GraalVM for JDK21 is simplified, but what has gone much more complicated is installing JavaScript polyglot libraries for GraalVM. With GraalVM for JDK 17 there was a command “gu install” for it, but it has been removed starting from GraalVM for JDK 21.
ORDS installation checklist 24.3 acknowledges it, but then gives some strange XML code on how to install them. Not helpful for non-developers, like me. This XML is intended to describe dependencies for Java project (using Maven), so during build the dependencies would be fetched automatically. But I have nothing to build – GraphQL support is already in ORDS, I just need the dependencies downloaded.
I think, if the extra libraries are needed for ORDS built in functionality to work, ORDS should include them by default.
Installation steps
I know pretty much all software can be downloaded using Oracle provided yum repositories, but here I’m doing everything manually, to be able to control the versions precisely. And not to mess with RPM-s, unzipping this is so much easier and predictable and more usable across all possible Linux distributions.
All software is placed under /home/ords in my example.
First lets download GraalVM for JDK 21 itself. Oracle has started to offer non-website-clicking “script friendly” URLs that always point to the latest version, you can get them here. I’m not going to use ANY latest URL Oracle offers on purpose, since I’m an automation guy I need to be able to download predictable and internally tested versions of the software and be able to validate the downloaded software against known checksum value.
Download the software, all versions are current at the time of writing, but of course are very soon out of date
# GraalVM for JDK21
https://download.oracle.com/graalvm/21/archive/graalvm-jdk-21.0.5_linux-x64_bin.tar.gz

# Maven
https://dlcdn.apache.org/maven/maven-3/3.9.9/binaries/apache-maven-3.9.9-bin.tar.gz

# ORDS
https://download.oracle.com/otn_software/java/ords/ords-24.3.0.262.0924.zip
In Ansible something like this, also unzipping them. Take it as an example, and not copy it blindly
# Facts
graalvm_download_url: "https://download.oracle.com/graalvm/21/archive/graalvm-jdk-21.0.5_linux-x64_bin.tar.gz"
graalvm_download_checksum: "sha256:c1960d4f9d278458bde1cd15115ac2f0b3240cb427d51cfeceb79dab91a7f5c9"
graalvm_install_dir: "{{ ords_install_base }}/graalvm"

maven_download_url: "https://dlcdn.apache.org/maven/maven-3/3.9.9/binaries/apache-maven-3.9.9-bin.tar.gz"
maven_download_checksum: "sha512:a555254d6b53d267965a3404ecb14e53c3827c09c3b94b5678835887ab404556bfaf78dcfe03ba76fa2508649dca8531c74bca4d5846513522404d48e8c4ac8b"
maven_install_dir: "{{ ords_install_base }}/maven"

ords_download_url: "https://download.oracle.com/otn_software/java/ords/ords-24.3.0.262.0924.zip"
ords_installer_checksum: "sha1:6e8d9b15faa232911fcff367c99ba696389ceddc"
ords_install_dir: "{{ ords_install_base }}/ords"
ords_install_base: "/home/ords"

# Tasks
- name: Download GraalVM
  ansible.builtin.get_url:
      url: "{{ graalvm_download_url }}"
      dest: "{{ ords_install_base }}/graalvm.tar.gz"
      checksum: "{{ graalvm_download_checksum }}"
      use_proxy: "{{ 'yes' if http_proxy is defined and http_proxy else 'no' }}"
  environment:
      https_proxy: "{{ http_proxy }}"
  register: graalvm_downloaded
- name: Unzip GraalVM
  ansible.builtin.unarchive:
      remote_src: yes
      src: "{{ ords_install_base }}/graalvm.tar.gz"
      dest: "{{ graalvm_install_dir }}"
      extra_opts:
          - "--strip-components=1"
  when: graalvm_downloaded is changed
# Download maven
- name: Download Maven
  ansible.builtin.get_url:
      url: "{{ maven_download_url }}"
      dest: "{{ ords_install_base }}/maven.tar.gz"
      checksum: "{{ maven_download_checksum }}"
      use_proxy: "{{ 'yes' if http_proxy is defined and http_proxy else 'no' }}"
  environment:
      https_proxy: "{{ http_proxy }}"
  register: maven_downloaded
- name: Unzip maven
  ansible.builtin.unarchive:
      remote_src: yes
      src: "{{ ords_install_base }}/maven.tar.gz"
      dest: "{{ maven_install_dir }}"
      extra_opts:
          - "--strip-components=1"
  when: maven_downloaded is changed
# Download ORDS
- name: Download ORDS
  ansible.builtin.get_url:
      url: "{{ ords_download_url }}"
      dest: "{{ ords_install_base }}/ords-latest.zip"
      checksum: "{{ ords_installer_checksum }}"
      use_proxy: "{{ 'yes' if http_proxy is defined and http_proxy else 'no' }}"
  environment:
      https_proxy: "{{ http_proxy }}"
  register: ords_downloaded
- name: Unzip ORDS installer
  ansible.builtin.unarchive:
      remote_src: yes
      src: "{{ ords_install_base }}/ords-latest.zip"
      dest: "{{ ords_install_dir }}"
  when: ords_downloaded is changed
Now the complicated part, adding GraalVM JavaScript polyglot libraries
Create pom.xml file in some directory with contents. 24.1.1 is the current JavaScript engine version, you can see the available versions in https://mvnrepository.com/artifact/org.graalvm.polyglot/polyglot
<?xml version="1.0" encoding="UTF-8"?>
<project xmlns="http://maven.apache.org/POM/4.0.0" xmlns:xsi="http://www.w3.org/2001/XMLSchema-instance" xsi:schemaLocation="http://maven.apache.org/POM/4.0.0 http://maven.apache.org/xsd/maven-4.0.0.xsd">
  <modelVersion>4.0.0</modelVersion>
  <groupId>eu.ilmarkerm.ords</groupId>
  <artifactId>ords-graaljs-download</artifactId>
  <version>1.1.1</version>
  <url>https://ilmarkerm.eu</url>
  <name>POM to download GraalVM JavaScript engine</name>
  <dependencies>
    <dependency>
        <groupId>org.graalvm.polyglot</groupId>
        <artifactId>polyglot</artifactId>
        <version>24.1.1</version>
    </dependency>
    <dependency>
        <groupId>org.graalvm.polyglot</groupId>
        <!-- Language: js -->
        <artifactId>js</artifactId>
        <version>24.1.1</version>
        <type>pom</type>
    </dependency>
  </dependencies>
</project>
Execute maven to download the required libraries and place them under ORDS libraries
/home/ords/maven/bin/mvn dependency:copy-dependencies -DoutputDirectory=/home/ords/ords/lib/ext -DuseBaseVersion=trueIt will download files like these (polyglot 24.1.1):
collections-24.1.1.jar
icu4j-24.1.1.jar
jniutils-24.1.1.jar
js-language-24.1.1.jar
nativebridge-24.1.1.jar
nativeimage-24.1.1.jar
polyglot-24.1.1.jar
regex-24.1.1.jar
truffle-api-24.1.1.jar
truffle-compiler-24.1.1.jar
truffle-enterprise-24.1.1.jar
truffle-runtime-24.1.1.jar
word-24.1.1.jar
Start ORDS (using GraalVM JDK) and then ORDS support for GraphQL is ready to be used.
Conclusion
I’m not a java developer, so things might be wrong here 🙂
But I do hope the situation improves over the next couple of ORDS versions.
- Written by: ilmarkerm
- Category: Blog entry
- Published: July 29, 2024
We are refreshing development databases from production using storage thin cloning. Everything works automatically and part of refresh procedure is also running some SQLPlus scripts, using OS authentication, as SYS.
One database also has APEX, that uses APEX Social Login feature to give users single sign-on for both APEX Builder and the end user application. You can read here how to set it up using Azure SSO. But since APEX is fully inside the database, this means that the production SSO credentials get copied over during database refresh.
I would like to have a SQL script that would run as part of the database refresh procedure, that would replace the APEX SSO credentials. And I’d like that script to run as SYS.
- Written by: ilmarkerm
- Category: Blog entry
- Published: April 7, 2024
Continusing to build Oracle Cloud Infrastructure with Terraform. Today moving on to compute instances.
But first some networking, the VCN I created earlier did not have access to the internet. Lets fix it now. The code below will add an Internet Gateway and modify the default route table to send out the network traffic via the Internet Gateway.
# network.tf

resource "oci_core_internet_gateway" "internet_gateway" {
    compartment_id = oci_identity_compartment.compartment.id
    vcn_id = oci_core_vcn.main.id
    # Internet Gateway cannot be associated with Route Table here, otherwise adding a route table rule will error with - Rules in the route table must use private IP as a target.
    #route_table_id = oci_core_vcn.main.default_route_table_id
}

resource "oci_core_default_route_table" "default_route_table" {
    manage_default_resource_id = oci_core_vcn.main.default_route_table_id
    compartment_id = oci_identity_compartment.compartment.id
    display_name = "Default Route Table for VCN"
    route_rules {
        network_entity_id = oci_core_internet_gateway.internet_gateway.id
        destination = "0.0.0.0/0"
        destination_type = "CIDR_BLOCK"
    }
}
Moving on to the compute instance itself. First question is – what operating system should it run – what is the source image. There is a data source for this. Here I select the latest Oracle Linux 9 image for ARM.
data "oci_core_images" "oel" {
    compartment_id = oci_identity_compartment.compartment.id
    operating_system = "Oracle Linux"
    operating_system_version = "9"
    shape = "VM.Standard.A1.Flex"
    state = "AVAILABLE"
    sort_by = "TIMECREATED"
    sort_order = "DESC"
}

# Output the list for debugging
output "images" {
    value = data.oci_core_images.oel
}
We are now ready to create the compute instance itself. In the metadata I provide my SSH public key, so I could SSH into the server.
resource "oci_core_instance" "arm_instance" {
    compartment_id = oci_identity_compartment.compartment.id
    # oci iam availability-domain list
    availability_domain = "MpAX:EU-STOCKHOLM-1-AD-1"
    # oci compute shape list --compartment-id
    shape = "VM.Standard.A1.Flex" # ARM based shape
    shape_config {
        # How many CPUs and memory
        ocpus = 2
        memory_in_gbs = 4
    }
    display_name = "test-arm-1"
    source_details {
        # The source operating system image
        # oci compute image list --all --output table --compartment-id
        source_id = data.oci_core_images.oel.images[0].id
        source_type = "image"
    }
    create_vnic_details {
        # Network details
        subnet_id = oci_core_subnet.subnet.id
        assign_public_ip = true
    }
    # CloudInit metadata - including my public SSH key
    metadata = {
        ssh_authorized_keys = "ssh-rsa AAAAB3NzaC1yc2EAAAADAQABAAABgQCZ4bqPK+Mwiy+HLabqJxCMcQ/hY7IPx/oEQZWZq7krJxkLLUI6lkw44XRCutgww1q91yTdsSUNDZ9jFz9LihGTEIu7CGKkzmoGtAWHwq2W38GuA5Fqr0r2vPH1qwkTiuN+VmeKJ+qzOfm9Lh1zjD5e4XndjxiaOrw0wI19zpWlUnEqTTjgs7jz9X7JrHRaimzS3PEF5GGrT6oy6gWoKiWSjrQA2VGWI0yNQpUBFTYWsKSHtR+oJHf2rM3LLyzKcEXnlUUJrjDqNsbbcCN26vIdCGIQTvSjyLj6SY+wYWJEHCgPSbBRUcCEcwp+bATDQNm9L4tI7ZON5ZiJstL/sqIBBXmqruh7nSkWAYQK/H6PUTMQrUU5iK8fSWgS+CB8CiaA8zos9mdMfs1+9UKz0vMDV7PFsb7euunS+DiS5iyz6dAz/uFexDbQXPCbx9Vs7TbBW2iPtYc6SNMqFJD3E7sb1SIHhcpUvdLdctLKfnl6cvTz2o2VfHQLod+mtOq845s= ilmars_public_key"
    }
}
And attach the block storage volumes I created in the previous post. Here I create attachments as paravirtualised, meaning the volumes appear on server as sd* devices, but also iSCSI is possible.
resource "oci_core_volume_attachment" "test_volume_attachment" {
    attachment_type = "paravirtualized"
    instance_id = oci_core_instance.arm_instance.id
    volume_id = oci_core_volume.test_volume.id

    # Interesting options, could be useful in some cases
    is_pv_encryption_in_transit_enabled = false
    is_read_only = false
    is_shareable = false
}

resource "oci_core_volume_attachment" "silver_test_volume_attachment" {
    # This is to enforce device attachment ordering
    depends_on = [oci_core_volume_attachment.test_volume_attachment]

    attachment_type = "paravirtualized"
    instance_id = oci_core_instance.arm_instance.id
    volume_id = oci_core_volume.silver_test_volume.id

    # Interesting options, could be useful in some cases
    is_pv_encryption_in_transit_enabled = false
    is_read_only = true
    is_shareable = false
}
Looks like OCI support some interesting options for attaching volumes, like encryption, read only and shareable. I can see them being useful in the future. If I log into the created server, the attached devices are created as sdb and sdc – where sdc was instructed to be read only. And indeed it is.
[root@test-arm-1 ~]# lsblk
NAME               MAJ:MIN RM  SIZE RO TYPE MOUNTPOINTS
sda                  8:0    0 46.6G  0 disk
├─sda1               8:1    0  100M  0 part /boot/efi
├─sda2               8:2    0    2G  0 part /boot
└─sda3               8:3    0 44.5G  0 part
  ├─ocivolume-root 252:0    0 29.5G  0 lvm  /
  └─ocivolume-oled 252:1    0   15G  0 lvm  /var/oled
sdb                  8:16   0   50G  0 disk
sdc                  8:32   0   50G  1 disk

[root@test-arm-1 ~]# dd if=/dev/zero of=/dev/sdb bs=1M count=10
10+0 records in
10+0 records out
10485760 bytes (10 MB, 10 MiB) copied, 0.0453839 s, 231 MB/s

[root@test-arm-1 ~]# dd if=/dev/zero of=/dev/sdc bs=1M count=10
dd: failed to open '/dev/sdc': Read-only file system- Written by: ilmarkerm
- Category: Blog entry
- Published: April 1, 2024
Continuing my series of exploring Oracle Cloud, with the help of Terraform code. You can find the previous post here. I will be referring to resources created in the earlier post.
Object store
Oracle Cloud does provide S3 style Object Storage, that is just called Buckets. Buckets can also speak S3 protocol, so they are usable for applications that speak S3.
One difference from AWS S3 is that in Oracle Buckets the storage class/tier is not at the object level, you have to specify during the creation of the Bucket if it is at the Standard or Archive tier.
Here I create two Buckets, one in standard tier and one archival.
# object_storage.tf

data "oci_objectstorage_namespace" "user_namespace" {
    compartment_id = oci_identity_compartment.compartment.id
}

resource "oci_objectstorage_bucket" "standard_bucket" {
    # Referencing compartment from earlier
    compartment_id = oci_identity_compartment.compartment.id
    name = "my-standard-tier-bucket"
    namespace = data.oci_objectstorage_namespace.user_namespace.namespace
    access_type = "NoPublicAccess"
    auto_tiering = "Disabled"
    object_events_enabled = true
    versioning = "Enabled"
    storage_tier = "Standard"
}

resource "oci_objectstorage_bucket" "archive_bucket" {
    # Referencing compartment from earlier
    compartment_id = oci_identity_compartment.compartment.id
    name = "my-archival-bucket"
    namespace = data.oci_objectstorage_namespace.user_namespace.namespace
    access_type = "NoPublicAccess"
    auto_tiering = "Disabled"
    object_events_enabled = false
    versioning = "Disabled"
    storage_tier = "Archive"
}
And also adding some lifecycle policies. One to abort multipart uploads that have not finished in days and also one policy to delete old object versions.
# object_storage.tf

# Bucket lifecycle policies

resource "oci_objectstorage_object_lifecycle_policy" "standard_bucket" {
    bucket = oci_objectstorage_bucket.standard_bucket.name
    namespace = data.oci_objectstorage_namespace.user_namespace.namespace

    rules {
        action = "ABORT"
        is_enabled = true
        name = "delete-uncommitted-multipart-uploads"
        target = "multipart-uploads"
        time_amount = 2
        time_unit = "DAYS"
    }
    rules {
        action = "DELETE"
        is_enabled = true
        name = "delete-old-versions"
        target = "previous-object-versions"
        time_amount = 60
        time_unit = "DAYS"
    }
}

resource "oci_objectstorage_object_lifecycle_policy" "archive_bucket" {
    bucket = oci_objectstorage_bucket.archive_bucket.name
    namespace = data.oci_objectstorage_namespace.user_namespace.namespace

    rules {
        action = "ABORT"
        is_enabled = true
        name = "delete-uncommitted-multipart-uploads"
        target = "multipart-uploads"
        time_amount = 2
        time_unit = "DAYS"
    }
}
Block storage
A very good improvement over AWS is that in Oracle Cloud you can define declarative backup policies for block storage used in your compute instances. They are automatic snapshots, that are also cleaned up automatically after the retention period has expired. Lets start with that and define a backup policy that is executed every day at 0:00 UTC and kept for 60 days.
# block_storage.tf

resource "oci_core_volume_backup_policy" "test_policy" {
    compartment_id = oci_identity_compartment.compartment.id
    display_name = "Block storage backup policy for testing"
    schedules {
        backup_type = "INCREMENTAL"
        period = "ONE_DAY"
        hour_of_day = 1
        time_zone = "UTC"
        # Keep backups for 60 days
        retention_seconds = 3600*24*60
    }
}
There are also some backup policies already defined by Oracle. Sadly you cannot specify in data resource the name of the policy you want to address, so some array magic is needed when using it later.
# block_storage.tf

data "oci_core_volume_backup_policies" "oracle_defined" {}

# For examining the output
output "oracle_defined_volume_backup_policies" {
    value = data.oci_core_volume_backup_policies.oracle_defined
}
Now lets create some block storage volumes. First volume is the cheapest, lowest performance; and the second volume is using balanced performance profile.
# block_storage.tf

resource "oci_core_volume" "test_volume" {
    compartment_id = oci_identity_compartment.compartment.id
    # List availability domains
    # oci iam availability-domain list
    availability_domain = "MpAX:EU-STOCKHOLM-1-AD-1"
    is_auto_tune_enabled = false
    size_in_gbs = 50
    # vpus_per_gb = 0 - low cost option
    vpus_per_gb = 0
}

resource "oci_core_volume" "silver_test_volume" {
    compartment_id = oci_identity_compartment.compartment.id
    # List availability domains
    # oci iam availability-domain list
    availability_domain = "MpAX:EU-STOCKHOLM-1-AD-1"
    is_auto_tune_enabled = false
    size_in_gbs = 50
    # vpus_per_gb = 10 - balanced performance option
    vpus_per_gb = 10
}
And lets attach the volumes to their backup policies. First volume the the policy I created earlier and the second volume to Oracle defined backup policy.
resource "oci_core_volume_backup_policy_assignment" "test_volume" {
    asset_id = oci_core_volume.test_volume.id
    # Attach to user defined policy
    policy_id = oci_core_volume_backup_policy.test_policy.id
}

resource "oci_core_volume_backup_policy_assignment" "silver_test_volume" {
    asset_id = oci_core_volume.silver_test_volume.id
    # Attach to Silver policy
    policy_id = data.oci_core_volume_backup_policies.oracle_defined.volume_backup_policies[1].id
}
Efficient test database refresh using Data Guard Snapshot Standby, Multitenant and storage snapshots
- Written by: ilmarkerm
- Category: Blog entry
- Published: March 23, 2024
There are many different ways to refresh test database with production data. Here I’m going to describe another one, that might be more on the complex side, but the basic requirements I had are:
- Data must be cleaned before opening it up for testing. Cleaning process is extensive and usually takes a few days to run.
- Switching testing from old copy to a new copy must be relatively fast. Also if problems are discovered, we should be able to switch back to the old copy relatively fast.
- Databases are large, hundreds of terabytes, so any kind of data copy over network (like PDB cloning over database link) would take unacceptable amount of time and resources.
- There is no network connection between test database network and production database network, so PDB cloning over database link is not possible anyway.
- The system should work also with databases that have a Data Guard standby with Fast-Start Failover configured.
Any kind of copying the data will not work, since the databases are really large – so some kind of storage level snapshot is needed – and we can use a modern NAS system (that databases utilise over NFS) that can do snapshots and thin clones. Although not in multiple layers.
Here is one attempt to draw out the system. With a more complicated case where the test database actually has two database instances, in Data Guard Fast-Start Failover mode.
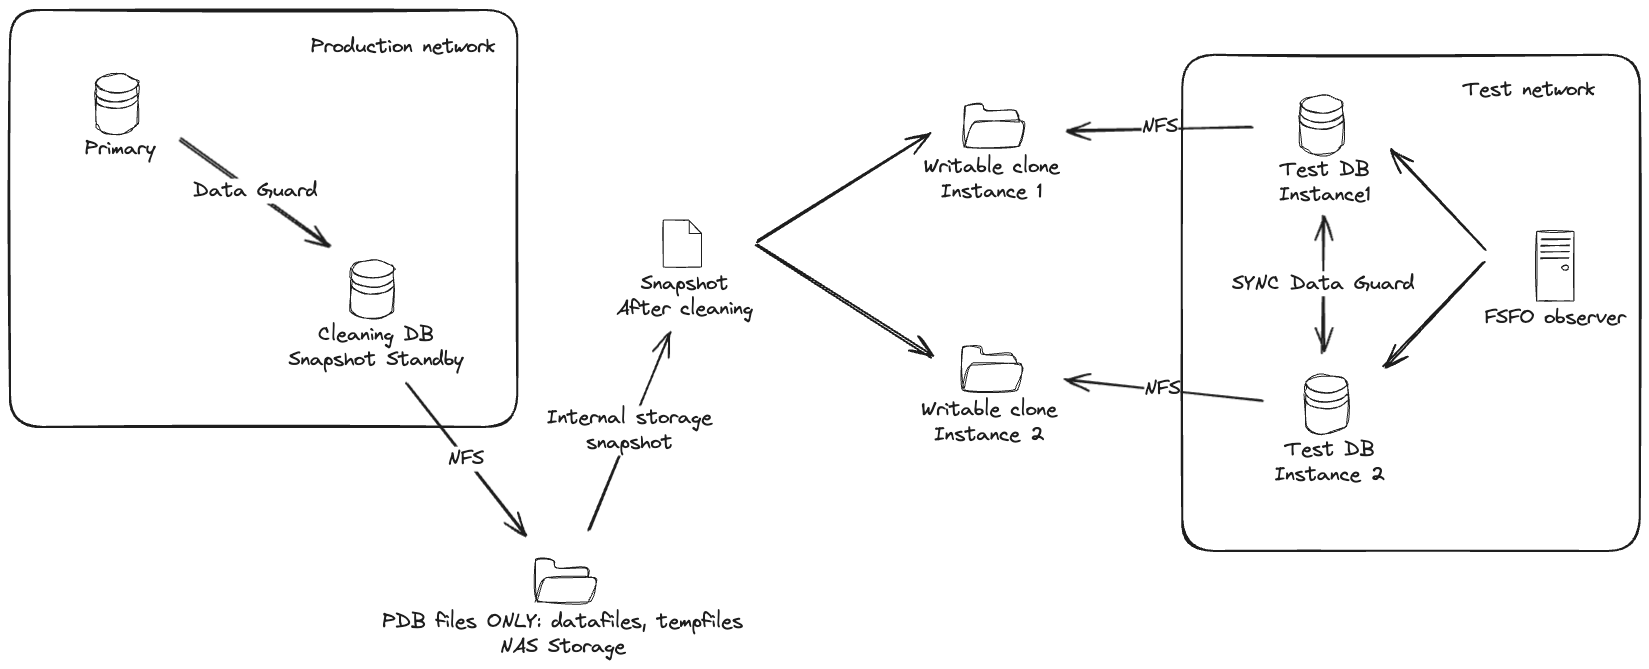
Basically:
- There is a special Data Guard standby for the cleaning process. This standby is using an external NAS storage for storing all PDB datafiles and tempfiles. No CDB files, like CDB datafiles, online logs, standby logs or recovery area should be stored in that NAS folder – keep CDB files separate.
- To start the cleaning process, put the cleaning standby in Snapshot Standby mode (instructions are here) and run all cleaning processes and scripts on the snapshot standby. After cleaning is finished successfully, create PDB metadata XML files and shut down the snapshot standby.
- Create storage level snapshot of the NAS folder storing the PDB files.
- Restore Snapshot Standby back to being a normal physical standby.
- Create writable clone from the same storage snapshot for the test database. If the test database consists of more Data Guard databases, then create a clone (from the same snapshot) for each one of them and mount them to the test database hosts.
- On the test database create a new pluggable database as clone (using NOCOPY to avoid any data movement). In case of Data Guard, do not forget to set standby_pdb_source_file_directory so the standby database would know where to find the data files of the plugged in database.
Done. Currently both old and new copy are attached to the same test CDB as independent PDBs, when you are happy with the new copy, just direct testing traffic to the new PDB. Then old one is not needed, drop it and clean up the filesystems.
Sounds maybe too complex, but the whole point is to avoid moving around large amounts of data. And key part of support rapid switching to the new copy and supporting Data Guard setups (on the test environment side) is keeping the test database CDB intact.
The steps
I have a post about using Snapshot Standby, you can read it here. All the code below is for the experts…
The preparation
Big part of the system is preparing the Cleaning DB that will be used for Snapshot Database.
Here I use the following paths:
- /oradata – Location for standby database CDB files, online logs, standby logs, recovery area
- /nfs/pdb – NFS folder from external NAS, that will ONLY store all PDB datafiles and tempfiles
# Parameters
NAME                                 TYPE        VALUE
------------------------------------ ----------- ------------------------------
db_create_file_dest                  string      /nfs/pdb
db_create_online_log_dest_1          string      /oradata
db_recovery_file_dest                string      /oradata
db_recovery_file_dest_size           big integer 10T

# Datafiles
    CON_ID NAME
---------- --------------------------------------------------------------------------------------------------------------------------
         1 /oradata/PROD1MT101CL/datafile/o1_mf_audit_tb__0d68332o_.dbf
         1 /oradata/PROD1MT101CL/datafile/o1_mf_sysaux__0d5fjj5y_.dbf
         1 /oradata/PROD1MT101CL/datafile/o1_mf_system__0d4zdst4_.dbf
         1 /oradata/PROD1MT101CL/datafile/o1_mf_undotbs1__0d5yw58n_.dbf
         1 /oradata/PROD1MT101CL/datafile/o1_mf_users__0d65hljg_.dbf
         2 /oradata/PROD1MT101CL/C24DD111D3215498E0536105500AAC63/datafile/data_D-WI93OP21_I-1717445842_TS-SYSAUX_FNO-4_q92k3val
         2 /oradata/PROD1MT101CL/C24DD111D3215498E0536105500AAC63/datafile/data_D-WI93OP21_I-1717445842_TS-SYSTEM_FNO-2_p32k3v89
         2 /oradata/PROD1MT101CL/C24DD111D3215498E0536105500AAC63/datafile/data_D-WI93OP21_I-1717445842_TS-UNDOTBS1_FNO-6_q22k3vag
         3 /nfs/pdb/PROD1MT101CL/CC1BE00B92E672FFE053F905500A1BAE/datafile/o1_mf_audit_tb__0fbbwglb_.dbf
         4 /nfs/pdb/PROD1MT101CL/C2811CAFC29D1DC9E053F905500A7EC9/datafile/o1_mf_audit_tb__0fk2wkxy_.dbf
         4 /nfs/pdb/PROD1MT101CL/C2811CAFC29D1DC9E053F905500A7EC9/datafile/o1_mf_users__0fj4hm5h_.dbf
         5 /nfs/pdb/PROD1MT101CL/CF6A94E61EF92940E053F905500AFB8E/datafile/o1_mf_audit_tb__0fsslsvv_.dbf
         5 /nfs/pdb/PROD1MT101CL/CF6A94E61EF92940E053F905500AFB8E/datafile/o1_mf_users__0frm1yg5_.dbf
         6 /nfs/pdb/PROD1MT101CL/CF6A94E61F3E2940E053F905500AFB8E/datafile/o1_mf_audit_tb__0fz8nq60_.dbf
         6 /nfs/pdb/PROD1MT101CL/CF6A94E61F3E2940E053F905500AFB8E/datafile/o1_mf_users__0fy4j81x_.dbf
         7 /nfs/pdb/PROD1MT101CL/CF6A94E61F832940E053F905500AFB8E/datafile/o1_mf_audit_tb__0f46dfvs_.dbf
         7 /nfs/pdb/PROD1MT101CL/CF6A94E61F832940E053F905500AFB8E/datafile/o1_mf_users__0f3cn007_.dbf
         8 /nfs/pdb/PROD1MT101CL/CF6A94E61FC82940E053F905500AFB8E/datafile/o1_mf_audit_tb__0g5h842b_.dbf
         8 /nfs/pdb/PROD1MT101CL/CF6A94E61FC82940E053F905500AFB8E/datafile/o1_mf_users__0g2v64l9_.dbf
         9 /nfs/pdb/PROD1MT101CL/05126406D61853B3E0635005500AA12B/datafile/o1_mf_audit_tb__0g9rsqpo_.dbf
         9 /nfs/pdb/PROD1MT101CL/05126406D61853B3E0635005500AA12B/datafile/o1_mf_inmemory__0g8yrdvh_.dbf

# Tempfiles
    CON_ID NAME
---------- -------------------------------------------------------------------------------------------------
         1 /oradata/PROD1MT101CL/datafile/o1_mf_temp__0d35c01p_.tmp
         2 /oradata/PROD1MT101CL/C24DD111D3215498E0536105500AAC63/datafile/o1_mf_temp__0d36q7dx_.tmp
         3 /nfs/pdb/PROD1MT101CL/CC1BE00B92E672FFE053F905500A1BAE/datafile/o1_mf_temp__0gr02w4t_.tmp
         3 /nfs/pdb/PROD1MT101CL/CC1BE00B92E672FFE053F905500A1BAE/datafile/o1_mf_temp__0gr0j0wr_.tmp
         3 /nfs/pdb/PROD1MT101CL/CC1BE00B92E672FFE053F905500A1BAE/datafile/o1_mf_temp_dba__0gqzydts_.tmp
         4 /nfs/pdb/PROD1MT101CL/C2811CAFC29D1DC9E053F905500A7EC9/datafile/o1_mf_temp__0grhwybg_.tmp
         4 /nfs/pdb/PROD1MT101CL/C2811CAFC29D1DC9E053F905500A7EC9/datafile/o1_mf_temp__0grjcvk4_.tmp
         4 /nfs/pdb/PROD1MT101CL/C2811CAFC29D1DC9E053F905500A7EC9/datafile/o1_mf_temp_dba__0h6slfch_.tmp
         5 /nfs/pdb/PROD1MT101CL/CF6A94E61EF92940E053F905500AFB8E/datafile/o1_mf_temp__0gokwd9n_.tmp
         5 /nfs/pdb/PROD1MT101CL/CF6A94E61EF92940E053F905500AFB8E/datafile/o1_mf_temp__0gol9jc6_.tmp
         5 /nfs/pdb/PROD1MT101CL/CF6A94E61EF92940E053F905500AFB8E/datafile/o1_mf_temp_dba__0gokr9ng_.tmp
         6 /nfs/pdb/PROD1MT101CL/CF6A94E61F3E2940E053F905500AFB8E/datafile/o1_mf_temp__0gnrh7x8_.tmp
         6 /nfs/pdb/PROD1MT101CL/CF6A94E61F3E2940E053F905500AFB8E/datafile/o1_mf_temp__0gnrw0dj_.tmp
         6 /nfs/pdb/PROD1MT101CL/CF6A94E61F3E2940E053F905500AFB8E/datafile/o1_mf_temp_dba__0gnrb2gg_.tmp
         7 /nfs/pdb/PROD1MT101CL/CF6A94E61F832940E053F905500AFB8E/datafile/o1_mf_temp__0gmw72co_.tmp
         7 /nfs/pdb/PROD1MT101CL/CF6A94E61F832940E053F905500AFB8E/datafile/o1_mf_temp__0gmwnqsp_.tmp
         7 /nfs/pdb/PROD1MT101CL/CF6A94E61F832940E053F905500AFB8E/datafile/o1_mf_temp_dba__0gmw1xm3_.tmp
         8 /nfs/pdb/PROD1MT101CL/CF6A94E61FC82940E053F905500AFB8E/datafile/o1_mf_temp__0gm118wt_.tmp
         8 /nfs/pdb/PROD1MT101CL/CF6A94E61FC82940E053F905500AFB8E/datafile/o1_mf_temp__0gm1dv5n_.tmp
         8 /nfs/pdb/PROD1MT101CL/CF6A94E61FC82940E053F905500AFB8E/datafile/o1_mf_temp_dba__0gm0wzcc_.tmp
         9 /nfs/pdb/PROD1MT101CL/05126406D61853B3E0635005500AA12B/datafile/o1_mf_temp__0gj66tgb_.tmp
         9 /nfs/pdb/PROD1MT101CL/05126406D61853B3E0635005500AA12B/datafile/o1_mf_temp_dba__0gh7wbpf_.tmp

# Logs
MEMBER
--------------------------------------------------------
/oradata/PROD1MT101CL/onlinelog/o1_mf_1__0b0frl6b_.log
/oradata/PROD1MT101CL/onlinelog/o1_mf_2__0b1qco5j_.log
/oradata/PROD1MT101CL/onlinelog/o1_mf_3__0b2bd0od_.log
/oradata/PROD1MT101CL/onlinelog/o1_mf_4__0b2z3qvo_.log
/oradata/PROD1MT101CL/onlinelog/o1_mf_5__0b3tkddo_.log
/oradata/PROD1MT101CL/onlinelog/o1_mf_6__0b4gvg2h_.log
/oradata/PROD1MT101CL/onlinelog/o1_mf_7__0b51zbqp_.log
Cleaning
# Convert the special Data Guard standby database to a snapshot standby
DGMGRL> convert database prod1mt101cl to snapshot standby;

# Now run all your cleaning scripts on this special database
SQL> @all_of_my_special_cleaning_scripts

# Cleaning is now finished successfully
# Close and reopen each PDB in READ ONLY mode
SQL> alter pluggable database all close;
SQL> alter pluggable database all open read only;

# Create XML metadata file for each PDB
SQL> exec DBMS_PDB.DESCRIBE('/nfs/pdb/apppdb1.xml','APPPDB1');
SQL> exec DBMS_PDB.DESCRIBE('/nfs/pdb/apppdb2.xml','APPPDB2');
SQL> exec DBMS_PDB.DESCRIBE('/nfs/pdb/apppdb3.xml','APPPDB3');

# Shut down the cleaning database
SQL> shutdown immediate
Snapshot
Now use your NAS toolkit (REST API for example) to create a storage level snapshot from the /nfs/pdb filesystem.
Convert Snapshot Standby back to physical standby
Use the instructions in this post to restore the cleaning instance back to being a physical standby.
Attach PDBs to test database CDB
First, use your NAS toolkit to create a thin writable from from the snapshot created earlier (or multiple clones if the test setup has a Data Guard standby, a dedicated copy for each) and mount them to the test database hosts as /nfs/newclone.
# If the test setup has Data Guard, set standby_pdb_source_file_directory
alter system set standby_pdb_source_file_directory='/nfs/newclone/PROD1MT101CL/CC1BE00B92E672FFE053F905500A1BAE/datafile/' scope=memory;

# On test primary create new pluggable database as clone
create pluggable database apppdb1_newclone as clone using '/nfs/newclone/apppdb1.xml' source_file_directory='/nfs/newclone/PROD1MT101CL/CC1BE00B92E672FFE053F905500A1BAE/datafile/' nocopy tempfile reuse;

# Open it
alter pluggable database apppdb1_newclone;
Done.